

Ever wondered how to transform a simple gum wrapper into art? You’re about to discover something magical.
Today I’ll show you how to make an Easy Gum Wrapper Crane Origami that’ll blow your mind. This isn’t just paper folding.
It’s pure enchantment waiting to unfold in your hands.
What Is a Gum Wrapper Origami Crane?
Let me tell you something cool. A gum wrapper crane is basically taking something you’d normally throw away and turning it into a beautiful piece of art. I’ve been making these little beauties for years, and they never get old.
The Origami Gum Wrapper Crane is a miniature version of the traditional Japanese paper crane. But here’s the kicker – you’re using gum wrappers instead of fancy origami paper. Talk about recycling with style!
These tiny cranes are perfect for gifts, decorations, or just impressing your friends. I remember the first time I made one. My buddy couldn’t believe I’d turned his discarded gum wrapper into something so elegant.
Understanding Key Terms
Origami : The Japanese art of paper folding that transforms flat sheets into intricate three-dimensional forms
Crease : A sharp fold line created by pressing firmly along the fold
Valley Fold : A fold where the crease points toward you, creating a “valley” shape
Mountain Fold : A fold where the crease points away from you, resembling a mountain peak
Base : The foundational folded form that serves as the starting point for more complex shapes
Materials Needed
Here’s everything you’ll need for your Simple Origami Gum Wrapper Crane Step by step project:
| Material | Quantity | Purpose | Tips |
|---|---|---|---|
| Gum Wrapper | 1 piece | Main folding material | Choose rectangular wrappers for best results |
| Clean Workspace | 1 area | Provides stable folding surface | Good lighting helps see fold lines clearly |
| Patience | Unlimited | Essential for precision folding | Take breaks if frustrated |
| Gentle Hands | 2 hands | Prevents tearing thin wrapper | Gum wrappers are more delicate than regular paper |
The beauty of this project? You probably have everything you need right now. No fancy supplies required!
Step-by-Step Instructions: How to Make Origami Gum Wrapper Crane
Ready to dive in? Here are the Origami Gum Wrapper Crane instructions that’ll guide you from start to finish.
Step 1: Prepare Your Gum Wrapper
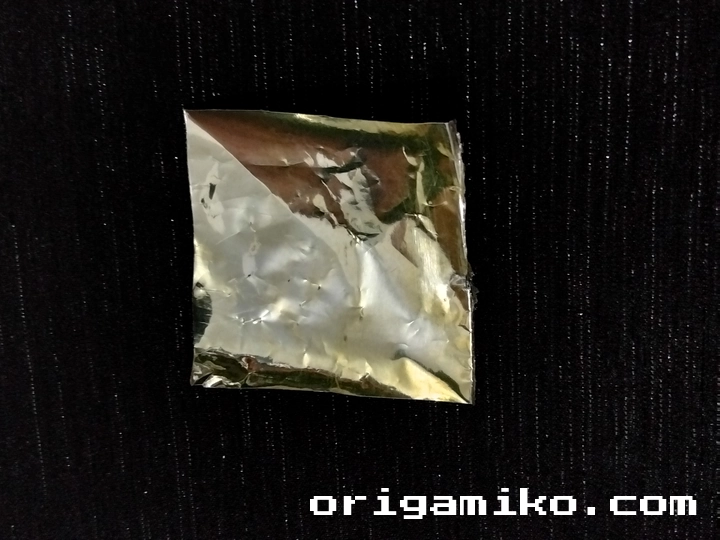
Take your gum wrapper and smooth it out completely. I can’t stress this enough – every wrinkle matters when you’re working with such thin material.
Make sure the wrapper is clean and free from any sticky residue. Trust me, I learned this the hard way when my first attempt stuck to itself!
Step 2: Create the Foundation Creases
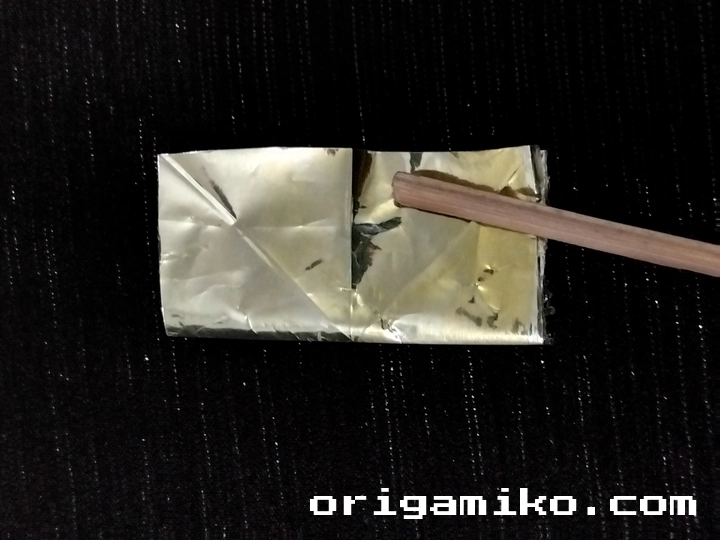
Now comes the fun part. Fold it in crisscross and horizontally and vertically. This creates your basic grid pattern.
First, fold the wrapper in half lengthwise. Unfold it. Then fold it in half the other way. Unfold again.
Next, fold it diagonally both ways. You’ll end up with an X pattern crossing through the center lines. These creases are your roadmap for everything that follows.
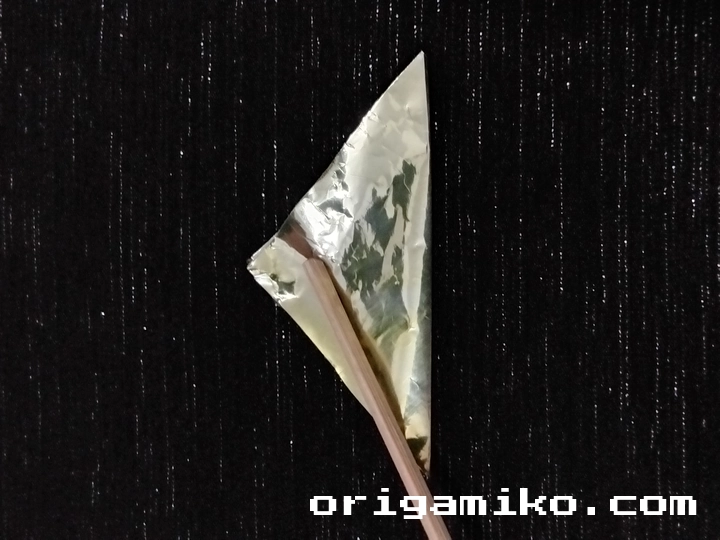
Step 3: Form the Base Structure

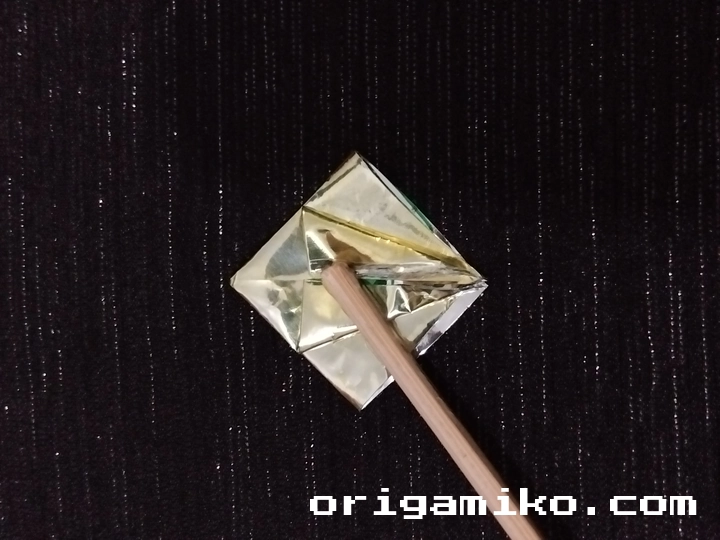
Make a crease. Fold both lower corners then fold it. Repeat it to other side.
This step transforms your flat wrapper into a three-dimensional form. Push the sides together while bringing the top down. The diagonal creases you made earlier will guide this movement naturally.
It might feel awkward at first. That’s totally normal! I remember struggling with this step initially, but once it clicks, you’ll never forget it.
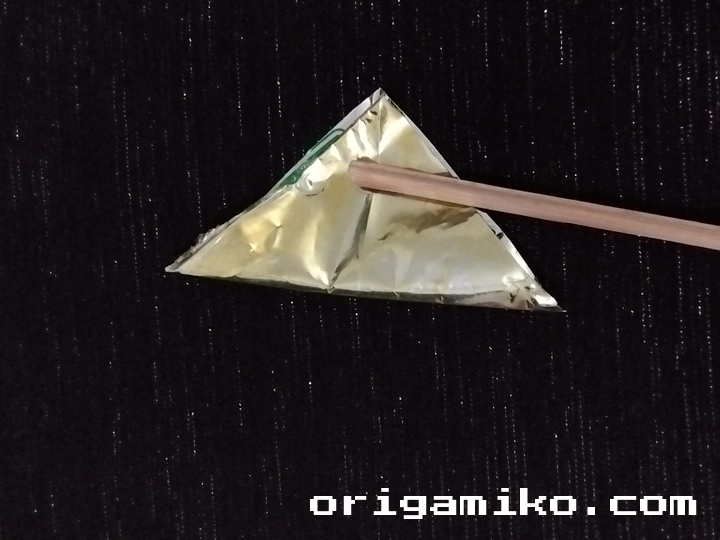
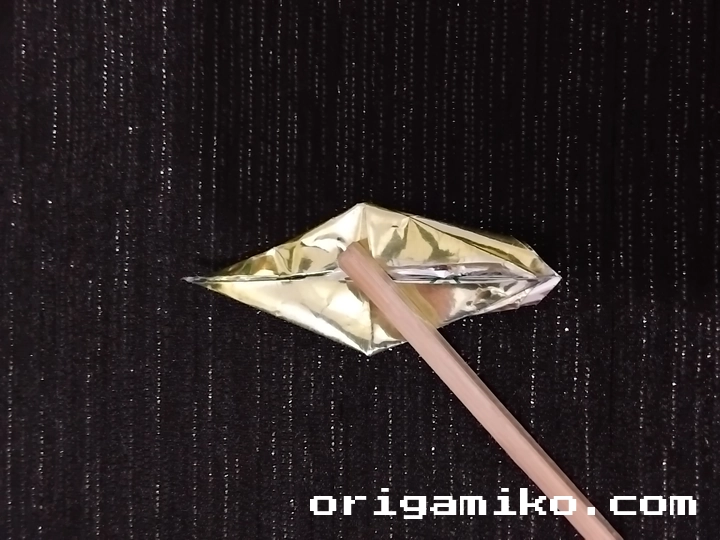
Step 4: Shape the Body

Fold both lower part from the middle.
You’re creating the crane’s body now. Take the bottom flaps and fold them upward along the center line. This gives your crane its distinctive diamond shape.
The wrapper might want to spring back. That’s okay – just be gentle but firm with your folds.
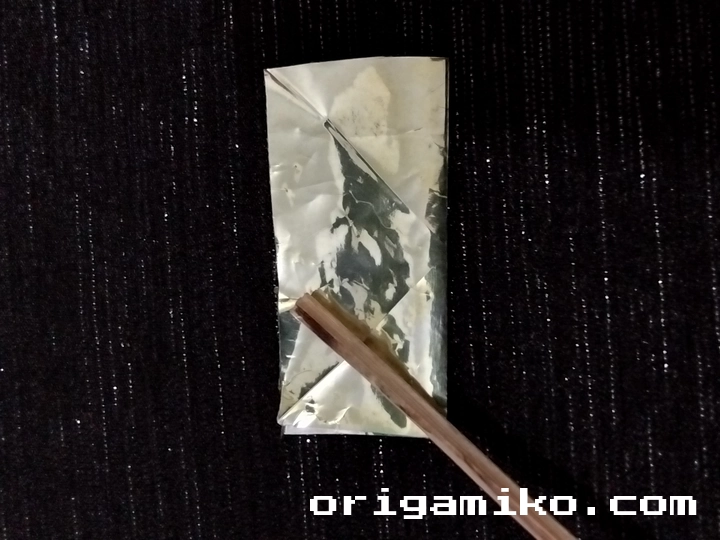
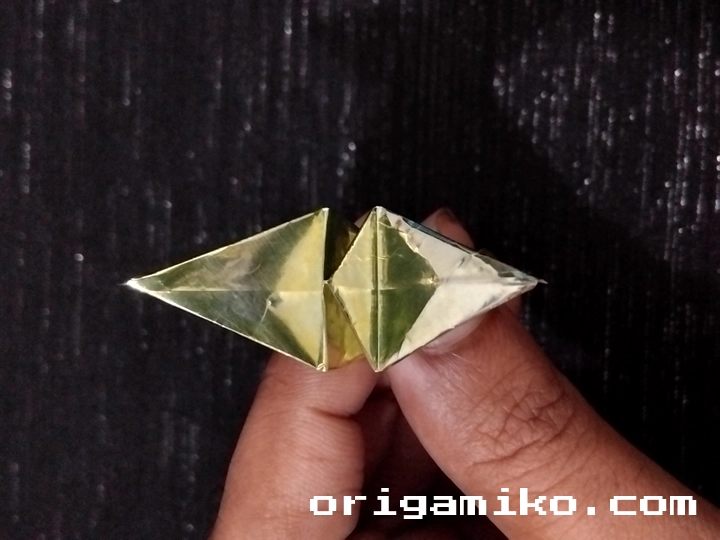
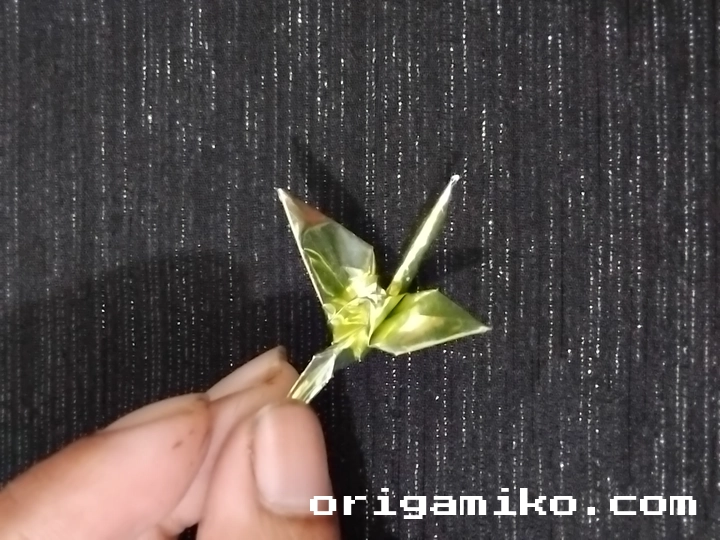
Step 5: Create the Final Details
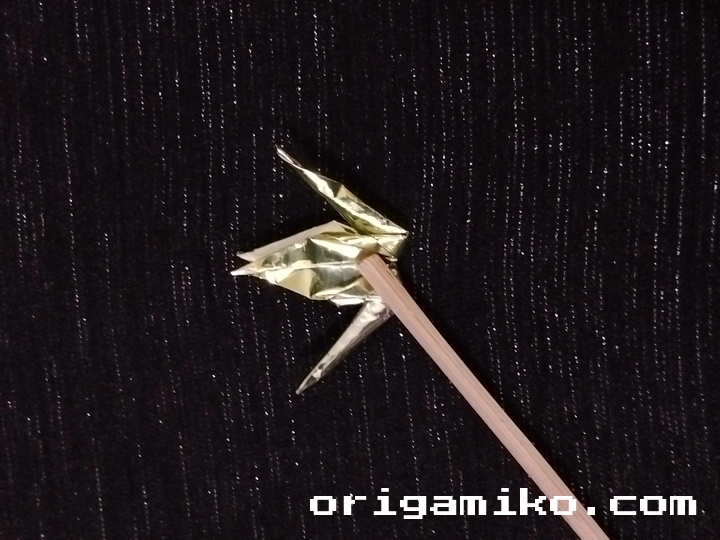
Make folds like the picture.
This is where your crane really comes to life. You’ll be forming the head, tail, and wings through a series of careful folds.
Pull the points apart gently to create the head and tail. The wings will naturally separate as you do this.
Step 6: Finishing Touches
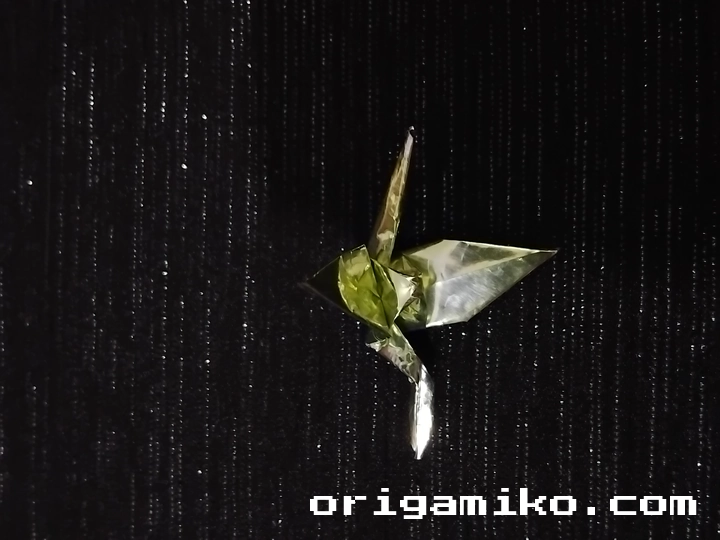
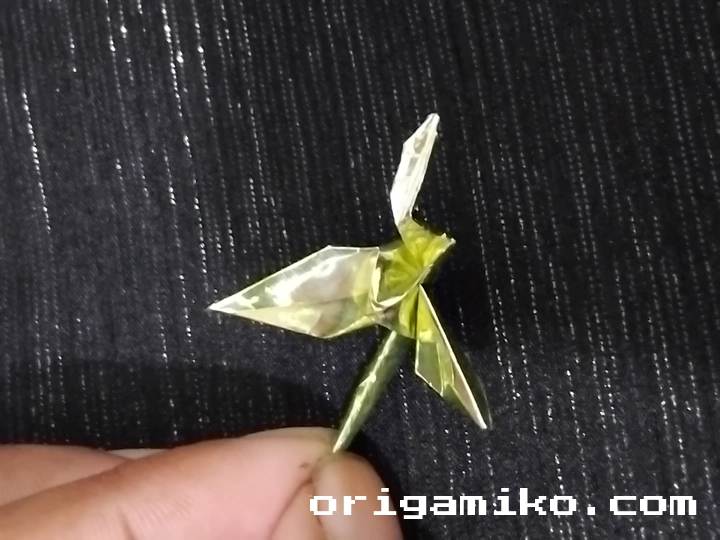
Now the Gum Wrapper Origami Crane is ready.
Give your crane a final inspection. Adjust any loose folds and make sure everything looks symmetrical.
Congratulations! You’ve just completed your first gum wrapper crane.
Tips for Success
Let me share some wisdom I’ve gathered from making hundreds of these little beauties:
• Work slowly – Gum wrappers tear easily, so patience is your best friend • Use good lighting – You need to see those fold lines clearly • Keep your hands clean – Oils from your skin can make the wrapper slippery • Practice makes perfect – Your first crane might not be Pinterest-worthy, and that’s fine • Choose the right wrapper – Rectangular ones work better than square ones • Don’t force it – If something doesn’t feel right, backtrack and try again
The biggest game-changer for me was realizing that gentle pressure works better than forcing the folds. These wrappers are delicate!
Common Mistakes and How to Avoid Them
I’ve made every mistake in the book, so you don’t have to. Here’s what to watch out for:
Tearing the wrapper during initial folds Solution: Use lighter pressure and work more slowly
Losing track of fold lines Solution: Make sure each crease is sharp and visible before moving to the next step
Uneven wings or body Solution: Double-check that your initial creases are symmetrical
Crane won’t hold its shape Solution: Ensure all folds are properly pressed and creased
Getting frustrated and giving up Solution: Take a break and come back with fresh eyes
The key is remembering that everyone struggles at first. I probably threw away a dozen torn wrappers before getting my technique down.
Similar Variations You Can Make
Once you’ve mastered the basic crane, why stop there? Here are some variations I love making:
Mini Lotus Flowers – Use the same folding principles but create petal shapes instead
Butterfly Wings – Similar to the crane but with different final shaping
Simple Stars – Great for beginners who want something a bit easier
Geometric Shapes – Abstract designs that look modern and artistic
Chain of Cranes – Link multiple cranes together for decorative garlands
Each variation teaches you new folding techniques while building on what you already know.
The Magic Behind the Tradition
There’s something special about origami that goes beyond just folding paper. In Japanese culture, paper cranes symbolize peace, hope, and healing.
When you make a crane from a gum wrapper, you’re participating in this ancient tradition while also giving new life to something that would otherwise be thrown away.
I find it meditative. There’s something about the repetitive folding motions that calms my mind after a stressful day.
Troubleshooting Your Crane
Having trouble? Don’t worry – I’ve been there. Here’s how to fix common issues:
If your crane looks lopsided, check that your initial creases were symmetrical. If not, you might need to start over with a fresh wrapper.
If the wings won’t separate properly, you might not have made the diagonal folds sharp enough in step two.
If the whole thing falls apart, you probably used too much force. Remember – gentle pressure is key with these delicate materials.
Advanced Techniques for Experienced Folders
Ready to level up your game? Try these advanced approaches:
Use different colored gum wrappers to create rainbow effects. I once made a whole flock using wrappers from different gum brands.
Experiment with size variations by using different wrapper dimensions. Some gum comes in unusually shaped packages that create interesting proportions.
Try combining multiple wrappers into one crane for a patchwork effect. This requires careful planning but creates stunning results.
Storage and Display Ideas
Your finished cranes deserve proper presentation. Here’s what I’ve learned about keeping them looking great:
Store them in a dry place away from direct sunlight. The thin wrapper material can fade or become brittle over time.
Create shadow boxes for display. The small size makes them perfect for miniature scenes.
String them together as garlands for parties or permanent decorations.
Give them as gifts in small jewelry boxes. People are always amazed when they realize what they’re made from.
FAQs
Q: Can I use any type of gum wrapper? A: Most rectangular wrappers work well. Avoid wrappers with too much wax coating as they don’t hold creases well.
Q: How long does it take to make one crane? A: With practice, about 5-10 minutes. Your first one might take 20-30 minutes as you learn the steps.
Q: What if my wrapper tears? A: Unfortunately, you’ll need to start over with a new wrapper. This is why I always recommend working slowly and gently.
Q: Can kids make these? A: Absolutely! Kids often have more patience for detail work than adults. Just supervise younger children with the folding steps.
Q: How can I make the creases sharper? A: Use your fingernail or a bone folder (if you have one) to press along the fold lines firmly.
Q: Why doesn’t my crane look like the pictures? A: Every wrapper is slightly different in size and thickness. Your crane will have its own character – that’s part of the charm!
The Environmental Impact
Here’s something I really love about this craft – it’s incredibly eco-friendly. Instead of throwing away gum wrappers, you’re turning them into art.
I challenge you to save every gum wrapper for a month and see how many cranes you can make. You’ll be surprised by the volume!
Some of my friends have started collecting wrappers from their entire office. It’s become a fun group activity during lunch breaks.
Building Your Origami Skills
Making gum wrapper cranes is just the beginning of your origami journey. These how to make Origami Gum Wrapper Crane skills transfer directly to traditional paper folding.
Start with simple projects and gradually work your way up to more complex designs. The patience and precision you develop here will serve you well in all paper crafts.
Consider joining origami communities online or in your local area. There’s something wonderful about sharing this ancient art with others.
Sharing Your Creations
Don’t keep your beautiful cranes to yourself! Here are some ways to share the joy:
Teach friends and family the technique. There’s nothing quite like seeing someone’s face light up when they complete their first crane.
Leave tiny cranes in library books as bookmarks. It’s a small way to brighten someone’s day.
Use them as gift toppers instead of bows. They’re conversation starters that show you put thought into presentation.
Create crane “releases” at special events. While you can’t actually release gum wrapper cranes outdoors (they’re not biodegradable), you can use them symbolically indoors.
The Meditative Aspect
I want to touch on something personal here. Making these cranes has become a form of meditation for me.
When life gets overwhelming, I sit down with a pile of gum wrappers and just fold. There’s something about the repetitive motions and the focus required that quiets my mind.
Many people find origami therapeutic. The concentration required pushes out other worries and creates a peaceful mental state.
If you’re dealing with stress or anxiety, give this a try. You might be surprised by how calming it can be.
Wrapping Up Your Crane-Making Journey
You’ve just learned how to transform something ordinary into something extraordinary. The Easy Gum Wrapper Crane Origami technique you’ve mastered today is more than just a craft – it’s a gateway to mindfulness, creativity, and environmental consciousness.
Remember, every expert was once a beginner. Your first crane might not be perfect, but each one you make will be better than the last. Keep practicing, stay patient with yourself, and most importantly, have fun with this Simple Origami Gum Wrapper Crane Step by step process. Before you know it, you’ll be creating these delicate beauties with confidence and joy.