
Ever wondered how a simple piece of paper transforms into something extraordinary? Today I’ll show you exactly how to make Origami Gloves that’ll amaze everyone around you.
This isn’t just another craft project. It’s your ticket to discovering the enchanting world of paper folding, where creativity meets precision.
What Are Origami Gloves?
Let me tell you something exciting about Origami Gloves. They’re not just miniature paper accessories – they’re tiny masterpieces that showcase the beauty of Japanese paper folding art.
I remember the first time I saw someone create these delicate paper gloves. The transformation was mesmerizing. One moment, there was just a rectangular piece of paper. The next? A perfectly formed miniature glove that looked ready to fit a doll’s hand.
These Simple Origami Gloves Step by step creations represent more than just folded paper. They embody patience, precision, and the ancient art of origami that has captivated people for centuries. When you fold your first pair, you’re connecting with a tradition that spans generations.
Materials Needed
Here’s everything you’ll need for this project:
| Item | Specifications | Quantity | Purpose | Alternative Options |
|---|---|---|---|---|
| Origami Paper | 15cm x 8cm rectangle | 1 piece | Main glove body | Regular paper cut to size |
| White Paper Strip | 2cm x 8cm | 1 piece | Glove cuff detail | Light colored paper |
| Flat Surface | Clean, smooth | 1 area | Folding workspace | Table, desk, or book |
| Good Lighting | Natural or bright lamp | – | Clear visibility | Window light preferred |
| Optional: Ruler | Standard measuring | 1 piece | Paper sizing | Any straight edge works |
The beauty of origami lies in its simplicity. You don’t need expensive tools or complicated equipment. Just paper, your hands, and a bit of patience.
Step-by-Step Origami Gloves Instructions
Ready to dive into the how to make Origami Gloves? Let’s break this down into manageable steps that anyone can follow.
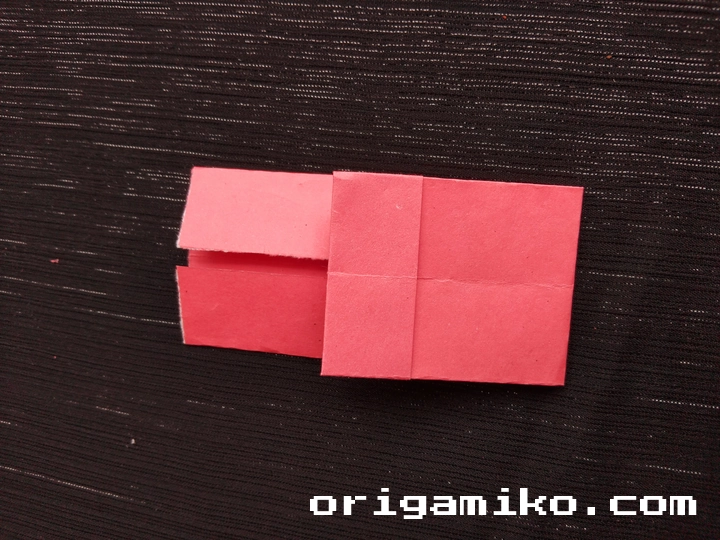
Step 1: Prepare Your Paper
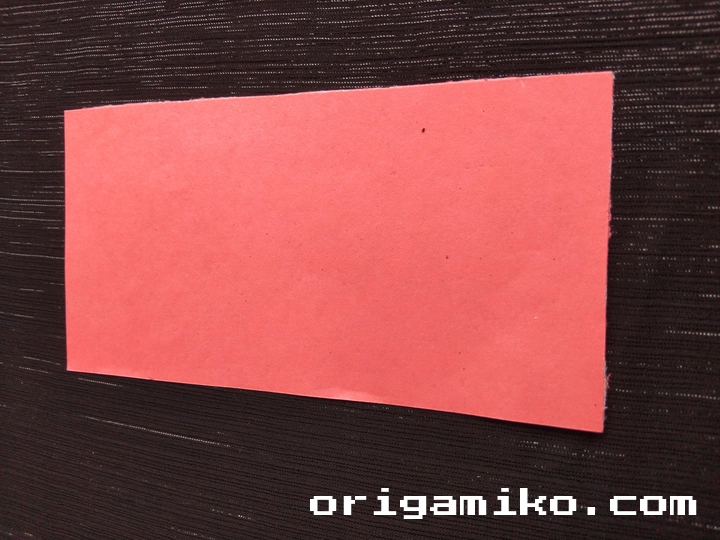
Take your 15cm x 8cm paper. Hold it with the longer side horizontal. This is your starting position.
Feel the paper between your fingers. Good origami starts with understanding your material. Is it crisp? Smooth? This tactile connection helps you fold with confidence.
Step 2: Create the Initial Folds

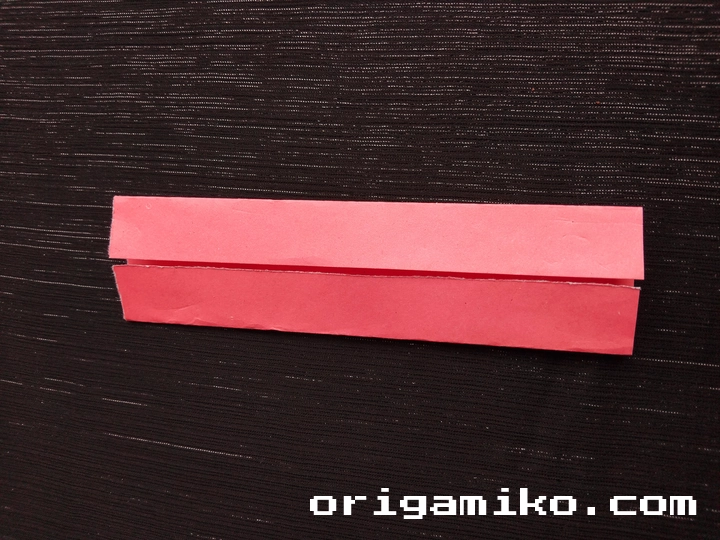
Fold the paper in half from the middle, bringing the shorter edges together. Press down firmly to create a sharp crease.
Now fold it in half again. You’re creating reference points that’ll guide the rest of your folding journey. These aren’t just random folds – they’re the foundation of your glove.
Step 3: Unfold and Adjust
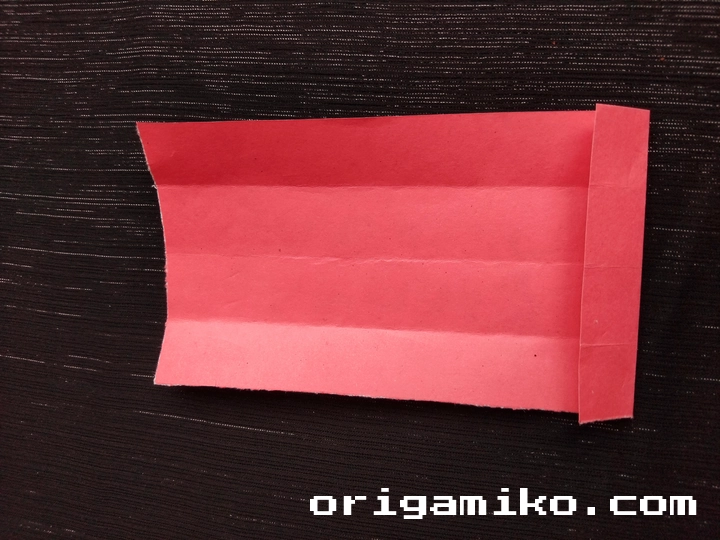
Unfold your paper completely. You’ll see creases that divide your paper into sections.
Fold the lower side slightly upward – about 1cm from the bottom edge. This creates the base of your glove’s palm area. Half fold the paper again, using your existing center crease as a guide.
Step 4: Shape the Glove Body
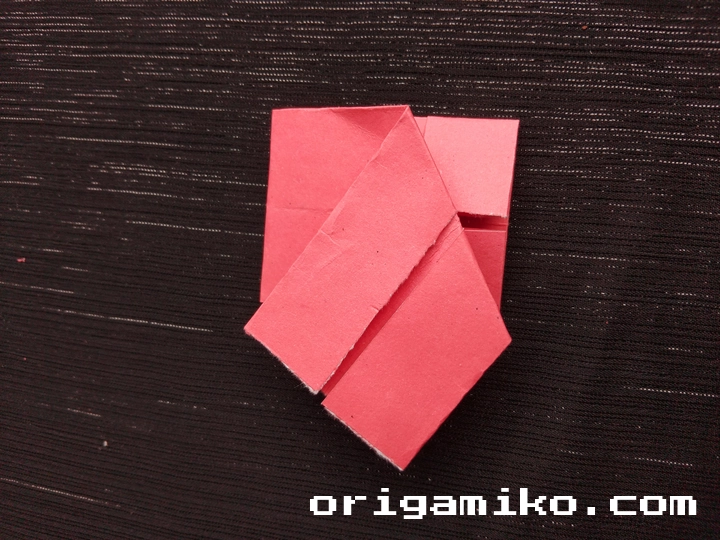
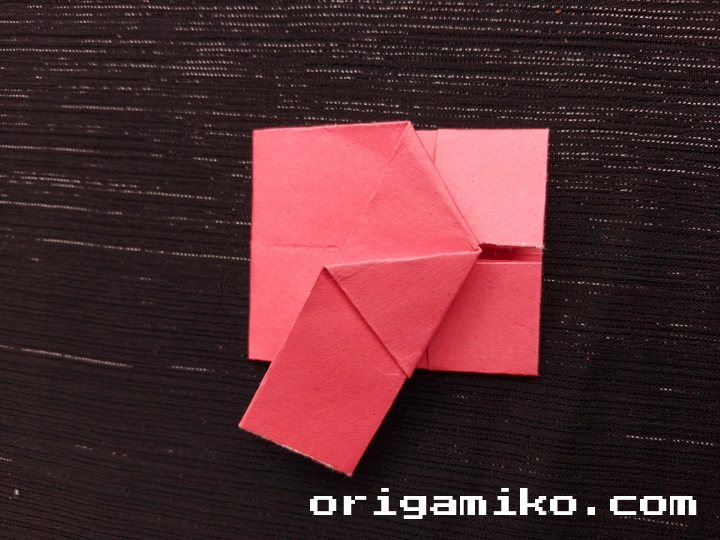
Here’s where the magic happens. Fold the paper from the middle crease you created earlier.
Look at your folded paper. You’ll need to create an angled fold that resembles a glove’s thumb area. Fold the extra material that extends beyond this angle. Gently fold the corners to soften the sharp edges – real gloves don’t have pointy corners!
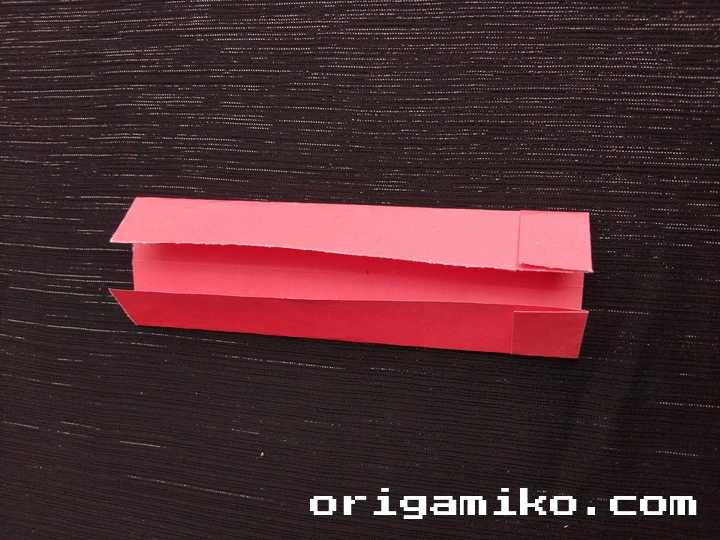
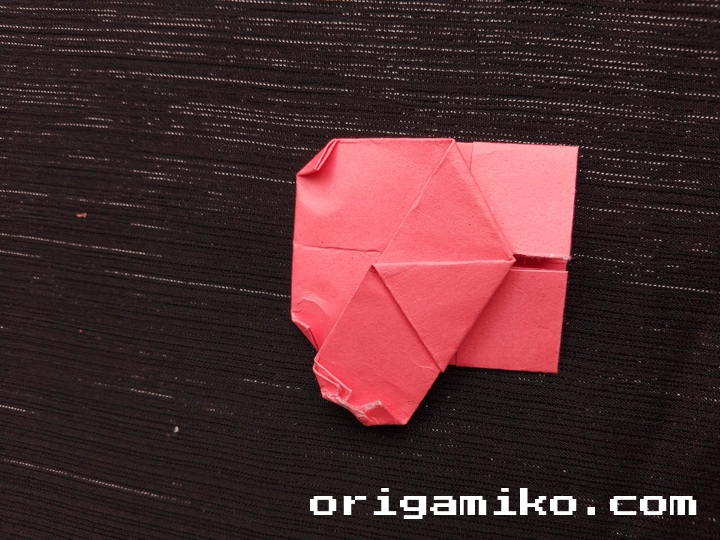
Step 5: Add the Finishing Touch
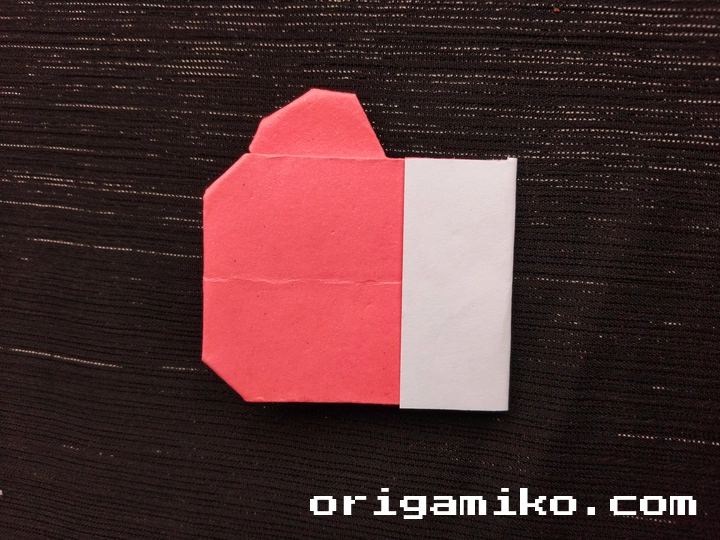
Take your white paper strip and attach it to the lower portion of your glove. This represents the glove’s cuff.
And there you have it! Your Origami Gloves are complete. Hold them up to the light and admire your handiwork.
Key Terms and Definitions
Origami : The Japanese art of paper folding that transforms flat sheets into three-dimensional sculptures without cuts or glue.
Crease : A sharp fold line created by pressing paper firmly, serving as a permanent guide for future folds.
Valley Fold : A fold where the paper bends toward you, creating a valley-like depression in the paper.
Mountain Fold : A fold where the paper bends away from you, creating a peak or mountain-like ridge.
Tips for Success
Want to create perfect origami gloves every time? Here are my tried-and-tested secrets:
• Start with quality paper. Thin, crisp paper holds creases better than thick cardstock.
• Work slowly. Rushing leads to uneven folds and frustration. Take your time with each step.
• Press creases firmly. Use your fingernail or a bone folder to create sharp, clean lines.
• Practice the basic folds first. Master simple valley and mountain folds before attempting complex projects.
• Keep your workspace clean. A cluttered area leads to distracted folding.
• Use consistent pressure. Apply the same amount of force to each fold for uniform results.
I’ve folded hundreds of origami pieces over the years. The difference between good and great origami often comes down to attention to these small details.
Common Mistakes and How to Avoid Them
Even experienced folders make mistakes. Here’s how to avoid the most common pitfalls:
Mistake: Uneven folds Solution: Line up edges carefully before pressing down. Take an extra second to ensure alignment.
Mistake: Weak creases Solution: Press harder and run your finger along the entire fold line. Weak creases lead to floppy final products.
Mistake: Working too fast Solution: Slow down. Origami rewards patience, not speed.
Mistake: Using the wrong paper size Solution: Stick to the 15cm x 8cm dimensions. Different sizes throw off the proportions.
Mistake: Forcing difficult folds Solution: If something doesn’t feel right, unfold and try again. Paper has memory – forcing it creates permanent damage.
I learned these lessons the hard way. My first origami gloves looked more like crumpled napkins than elegant accessories!
Similar Variations You Can Try
Once you’ve mastered basic origami gloves, why stop there? The paper folding world offers endless possibilities:
Origami Mittens Transform your glove pattern by eliminating the thumb section. Perfect for winter-themed displays.
Decorative Glove Garland Create multiple gloves in different colors and string them together for parties or seasonal decorations.
Miniature Glove Collection Experiment with different paper sizes to create tiny gloves for dollhouses or jewelry making.
Patterned Paper Gloves Use decorative scrapbook paper or newspaper for unique, artistic variations.
Two-Tone Gloves Combine two different colored papers for contrast between the glove body and cuff.
The techniques you learn making origami gloves transfer beautifully to other projects. It’s like learning a new language – suddenly, you can communicate with paper in ways you never imagined.
Advanced Techniques for Experienced Folders
Ready to take your glove-making to the next level? Try these advanced modifications:
Consider adding finger details by creating small additional folds along the glove’s edge. This technique requires precision but creates incredibly realistic results.
Experiment with wet-folding techniques for curved, organic shapes. Slightly dampen your paper before folding to achieve softer, more natural-looking curves.
Troubleshooting Your Origami Gloves
Sometimes things don’t go as planned. Here’s how to fix common issues:
If your glove looks lopsided, check that your initial center fold was accurate. An off-center beginning fold affects everything that follows.
If the cuff won’t stay attached, try using a tiny dot of glue or double-sided tape. While purists avoid adhesives, sometimes practicality wins.
The Cultural Significance of Origami
Understanding the history behind your craft enriches the experience. Origami represents more than folding paper – it embodies principles of transformation, patience, and finding beauty in simplicity.
When you create origami gloves, you’re participating in a tradition that teaches mindfulness and precision. Each fold requires attention to the present moment.
Frequently Asked Questions
Can I use regular printer paper for origami gloves? Absolutely! While origami paper works best, regular 20lb printer paper creates perfectly acceptable results. Cut it to the correct 15cm x 8cm size.
How long does it take to make origami gloves? For beginners, expect 10-15 minutes per glove. With practice, you’ll complete them in 3-5 minutes.
Can children make these gloves? Yes! Children ages 8 and up can successfully create origami gloves with adult guidance. It’s an excellent fine motor skill activity.
What if my gloves don’t look exactly like the pictures? That’s perfectly normal! Each person’s folding style creates slight variations. As long as the basic shape is recognizable, you’ve succeeded.
Can I make larger gloves? Sure! Scale up the paper proportionally. For example, use 30cm x 16cm paper for double-sized gloves.
How do I store finished origami gloves? Keep them flat in a book or folder to prevent crushing. Avoid humid areas that might cause paper to warp.
Displaying Your Origami Gloves
Your finished gloves deserve proper presentation! Consider these creative display ideas:
Mount them on colored cardstock for greeting cards or scrapbook pages. Frame multiple gloves in shadow boxes for dimensional art pieces.
Create seasonal displays by making gloves in appropriate colors – red and green for Christmas, pastels for spring celebrations.
Teaching Others to Make Origami Gloves
Sharing your new skill multiplies the joy. When teaching others, remember these key points:
Demonstrate each step slowly and clearly. Let students practice basic folds before attempting the complete project. Encourage patience and celebrate small successes along the way.
I’ve taught origami gloves to dozens of people. The moment when someone completes their first successful glove? Pure magic every single time.
Building Your Origami Skills
These gloves are just the beginning of your paper folding journey. The techniques you’ve learned – precision folding, understanding paper behavior, creating clean creases – apply to countless other origami projects.
Consider exploring other wearable origami items like hats, shoes, or jewelry. Each project builds upon skills learned in previous ones.
Summary
Learning to create Easy Origami Gloves opens doors to a fascinating world of paper artistry. Through this Simple Origami Gloves Step by step guide, you’ve discovered that complex-looking results come from mastering basic techniques and maintaining patience throughout the process.
The journey from flat paper to three-dimensional glove teaches valuable lessons about transformation, precision, and the beauty found in simplicity. Whether you’re creating these gloves for personal enjoyment, gifts, or teaching others, you’re now equipped with both the technical knowledge and creative confidence to succeed in your how to make Origami Gloves adventures.